Update: I found out that SRP has some rather nasty limitations (including the ability to circumvent it even as a limited user) which makes much less effective than I initially thought. I still thing it is very useful, but please read the linked article and make your own judgement call.
As I mentioned in a previous post non-standard configurations are very effective in preventing general malware attacks. In this post I want to give concrete advise on how to setup a Windows XP system so that there is no (or only minimal) usability loss, but the resulting system is highly resistant to attacks (both because it is a non-standard configuration and because it uses the built-in security features of Windows XP to a fuller extent).
This configuration is suitable for almost everyone using Windows XP. It is very suitable for scenarios where the computer is used for certain specific tasks only (like reading e-mail, browsing, playing a few games, etc) by non-expert users (and this is not a derogatory term, because not everybody has to be a computer geek, just as not everybody who drives a car needs to be a mechanic). I would encourage everyone who is supporting / maintaining other people’s Windows XP machines (for family members, relatives, friends or even for companies) to take a look at this post and think about implementing at least some of the advice.
This post will focus on the single-user/single-computer scenario. In companies, where the computers are member of a central domain, the principles behind the actions are the same, however there are more efficient ways of making the same changes en-masse on all the computers than performing the steps on every single computer one-by-one (like Group Policies).
Who wouldn’t want to perform these steps? I have used machines configured this way for many tasks, including ones which are commonly thought of as requiring high privileges (like developing software) with success. Really the only scenario I can think of are people who frequently install/uninstall software (for reviewing purposes for example), although in that scenario I would recommend using a Virtual Machine for doing the testing (unless the software really pushes the limit of the hardware like games, video editing software and so on).
Now back to our task of making Windows XP highly secure. The process consists of two high level steps:
- Configuring Software Restriction Policies (a less-known facility included in Windows XP using which we can control which software can run and which can’t – a basic application whitelisting/blacklisting tool)
- Reconfiguring the user so that she uses a standard privileged account rather than a high privileged one
All the tools described here are either already included in Windows XP or can be freely downloaded from the Internet (in which case links will be provided). A small caveat: free in this context means free for home use. If you wish to use these tools in a corporate environment, please check out their licensing terms for details.
Step 1
The first step is installing Windows XP (if you haven’t done so already) and any additional software that is needed on the computer:
- an office suite
- archiving utility
- an alternative browser if you want to together with browser plugins (Adobe Flash for example)
- a video player, audio player and codecs
- Java
- the .NET framework
- an instant messaging client
- and so on…
Also, don’t forget to apply all the updates available for Windows XP, which for a clean install at this point means around 90 patches. This will get slightly better later in the year when Microsoft will release all the updates bundled in Service Pack 3 for Windows XP.
The idea is to get the machine in a state where all the software (and pieces of software – like plugins) are configured the way that the end-users need them, since after applying the security settings major changes will be a three-step process: dropping the security, making the changes and raising the security. Of course I’m talking about major changes here like installing/uninstalling software, not about small changes like changing the homepage of your browser.
While installing an Anti-Virus product is not strictly necessary, because the configuration changes will render almost all malware unusable, having a multi-layer defense never hurts (also, in corporations it may be needed because of compliance issues). There are a couple of ones out there which are free for personal use (like Avast!, AntiVir, AVG and so on). From a personal experience I would recommend AVG (again, this is free for personal/home use only) because it has a rather small performance impact and can be configured to auto-update silently. If you choose to install AVG, be careful (since they do try to upsell you to the for-pay version – which is understandable) and always double check that you click the button corresponding to the free version.
Step 1a – configuring AVG
Update: since writing this tutorial Grisoft (the makers of AVG) released version 8 of their product and it is unsure how long they will be supporting version 7.5. If you wish to go with AVG, check out updated tutorial about AVG 8.
In the case you decided to go with AVG as your anti-malware protection layer, here are some quick tips. These suggestions were written based on the idea that the setup targets systems which are not operated by technologically savvy users, and thus useless messages should be hidden from them to avoid confusion.
First make sure that you download the free version. As I said before there are some tricks on the webpage to upsell you (like placing the for-pay version in the table before the free one).
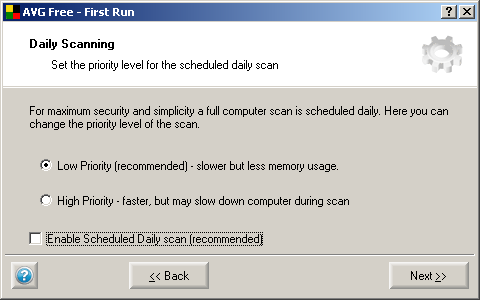
During the installation you will be asked if the system should be scanned daily (in addition to the on-access scanner watching). You can safely disable this, given all the other layers of safety, to avoid performance degradation.
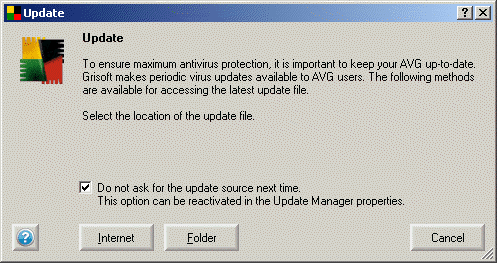
Also, make sure to select the option to update the product from the Internet and newer to ask the user about this (if you miss this during the installation, don’t worry, it can be changed later).
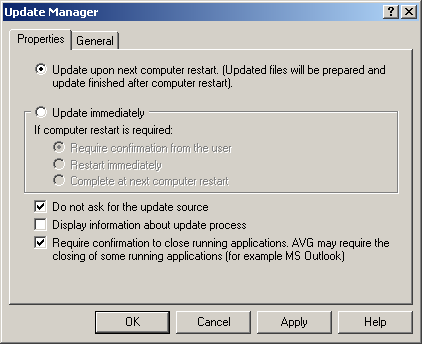
After the installation is done, go to the AVG Control Center, to the update module, right-click on it and select properties. There are three important settings here, shown also in the picture below:
- Update upon next computer restart – to avoid bothering the user with messages
- Do not ask for the update source – the setting from the previous step if you missed it during installation
- Display information about update process – this one must be unchecked, again to avoid messages which may be confusing for the users, like the one which can be seen in the second image

Step 2
Make the changes from the Control Panel which you need to. Some of the typical ones would be:
- Setting the screen resolution and color depth (if you are using an LCD be sure to set the resolution to the native resolution of the LCP panel)
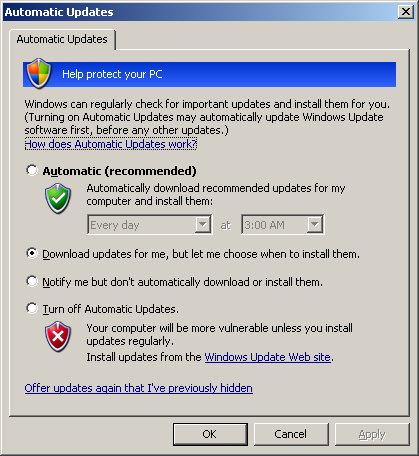
- Enable the automatic updates. For computers which you "visit" frequently I would recommend "Download updates for me, but let me choose when to install them", while for computers which you get to see less often the "Automatic" is the recommended setting (the thinking being that Microsoft has very good quality patches and if you can’t review and apply them in a timely manner – lets say two-three weeks after their release at most – its better to apply them than to stay vulnerable)
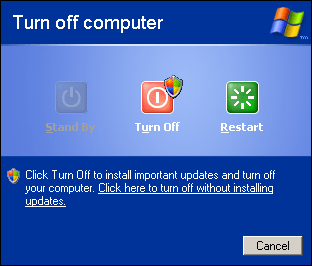
If you enable the automatic installation of the upadetes, the user will see the following screen during the shutdown:
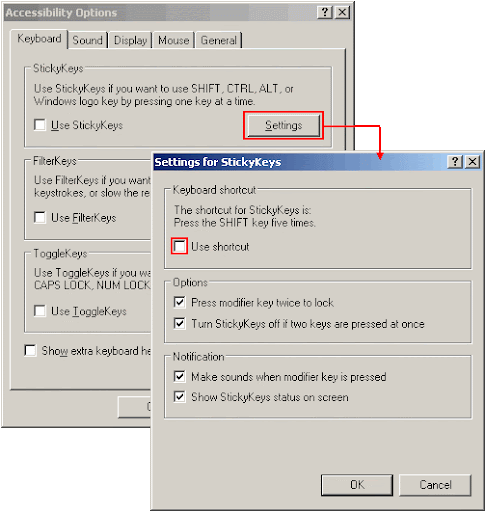
- Deactivate the accessibility options unless you need them. While it is great that they exists, they can confuse you even if you know what’s going on. For example the shortcut for the "Sticky Keys" feature is holding down the Shift key for five seconds, something which often happens to me when I stop to think during typing. A quick tip: after this it may happen that your Shift key seems to be "stuck" even if you answer "no" at the dialog asking to confirm the activation of the feature. You can unstuck it by pressing Ctrl+Alt+Shift at the same time and releasing them (I have no clue why this works, but it works – credit goes to a co-worker of mine who pointed this out). Also, watch out because you have to click on the "Settings" button for each feature on each tab separately and uncheck the "Use shortcut" option:
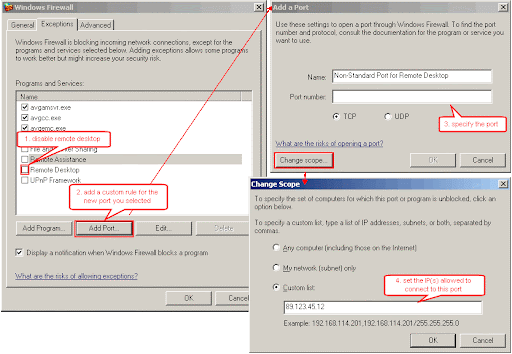
- Make sure that the Windows Firewall is enabled (it is by default) and that the exceptions added are strictly necessary (for example AVG adds itself to the exception list). Three very important settings are:
- File and Printer sharing – this should be off unless the computer is behind a router and you wish to share files with computers connected to the same router (so if you are behind a router but don’t want to share files, turn it off) – sidenote: if you are using a router, make sure to change the password for the administration interface.
- Remote Assistance – this is a technology which uses a combination of Microsoft specific technologies (MSN Messenger and Remote Desktop) to provide on-demand remote access to the computer. Unless you anticipate it being used (which from my experience has a very low probability), turn it off
- Remote Desktop – this is related to the remote assistance one. Again, unless you anticipate that remote access will be required to the computer, turn it off. If however you think that you will need access, remote desktop is a very good technology (and already built-in). Still, move it to a non-standard port and add a firewall rule to open access on that given port. Also, you don’t need to give access to everybody to these specific ports, you can limit it for example to the IP of the person who will be providing remote assistance.
- Add any alternate languages for the keyboard that you may need.
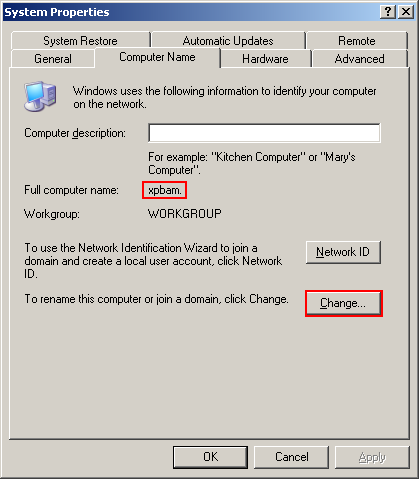
- Make sure that you know the "name" of the computer. This is set during the setup of Windows an usually contains a set of seemingly random letters/number (I’m sure that there is actually "reason behind the madness", that is a well defined algorithm for deriving these names for example from the MAC addresse, I just don’t know what that is, nor is it important). You can find it out by going to the Control Panel, double-clicking on System and checking out the Computer Name tab (the name doesn’t include the final dot, so in the example shown below it is "xpbam" not "xpbam."). You can also use this opportunity to change the name to something more memorable – don’t worry about conflicts, the name must only be unique inside the local network. For example if this will be a computer connected directly to the Internet, you can choose any name you want, because the "local network" includes just this single computer – if you disabled file sharing in the firewall. If the computer is behind a router, the local network means all the devices connected to the router.
- Also, make sure that you know the password for the "Administrator" account. This again is specified during the setup, but if you don’t remember it/don’t know it, change it from the command line by typing:
net user Administrator "here comes the password"
(remember to use a strong password!)
Step 3 – Setting up the Software Restriction Policy
After doing all this preparation work, we start getting to the "meat" of this process. Software Restriction Policy is an application whitelisting solution build into Windows XP which is not widely known, but very useful for preventing attacks by unknown malware. The goal of this step is to set up a policy which makes it possible to run already installed applications, but prevents the user from running (and implicitly installing) new and unknown applications. If the applications which the user needs were already set up during step one, this will create no usability problems.
We start by running the "Local Security Settings" application (technically it is a Microsoft Management Console Add-in, but this is not important for this discussion). This can be done either by going to the Control Panel, Administrative Tools and double clicking "Local Security Settings" or typing "secpol.msc" at the command line.
The first time the tool is run, there is no software restriction policy set. You have to create one by right-clicking on the "Software Restriction Policies" in the right panel and selecting "Create New Policies".
The second step is to add the allow rules. Go to the "Additional Rules" section and select "Action", "New Path Rule" and add two separate "Unrestricted" rules for "C:Program Files" and "C:Windows". If these paths differ because you installed Windows on a different drive (so it is D:Windows, not C:Windows for example) or because you are using a non-English version of Windows, change the paths accordingly. Also, if you have programs installed in other folders (not under Program Files), add those folders also. Software installed under "Program Files" does not need additional rules, since the path rules act as prefix-rules (meaning that the "Unrestricted" rule for Program Files allows us to run all the executables contained in the Program files folder and all its subfolders).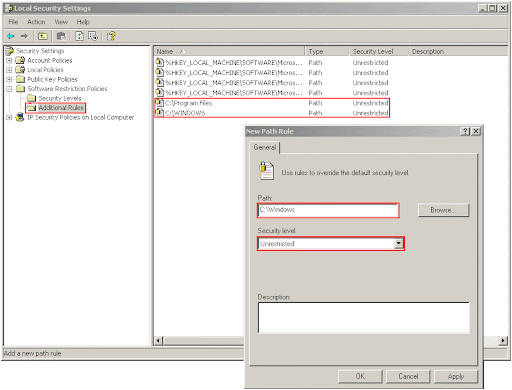
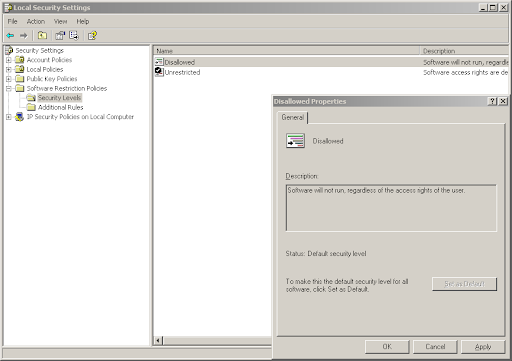
The next step is to disallow running applications from other locations. This is done by changing the default policy from "Unrestricted" to "Disallow". This can be done by going to "Security Levels", double clicking on "Disallowed" and clicking "Set as Default". (A warning will pop up saying that the new default policy is more restrictive than the previous one.)
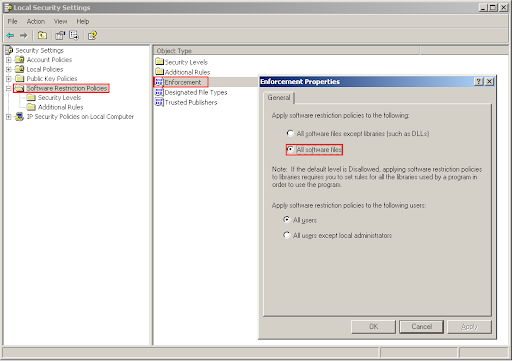
The second before last step is to apply these steps also to DLL’s (if you are interested in the technical details: unless you apply this rule on DLL’s, it is possible to circumvent this policy by compiling an application into a DLL and using the rundll32 tool – which can be executed, since it is in the C:WindowsSystem32 directory – to load the DLL). Microsoft disables this by default to prevent you from breaking things because not enough allow rules were set, however the rules defined in the previous step are sufficient to ensure that this won’t happen. To set this, go to the "Software Restriction Policies" on the right and double click "Enforcement" on the left. In the dialog box make sure that the "All software files" option is checked, as shown in the figure below:
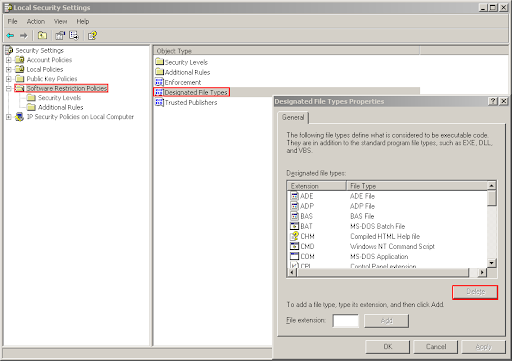
Finally, shorcut files (.lnk files) must be excepted from the control of this mechanism, so that the start menu and the desktop remain usable (both of them contain a collection of shortcuts and would have otherwise needed either an "allow" rule for each shorcut file in part or an exception rule for the different paths which make up the start menu). This is not a security vulnerability because you can’t rename "malware.exe" to "malware.lnk" and still be able to run it (as opposed to "malware.com" which is runnable). To do this, go to Software Restriction Policies on the right and double-click on "Designated File Types" on the left. Select the entry for "LNK" and press "Delete".
Step 4 – Changing the user account privilege level
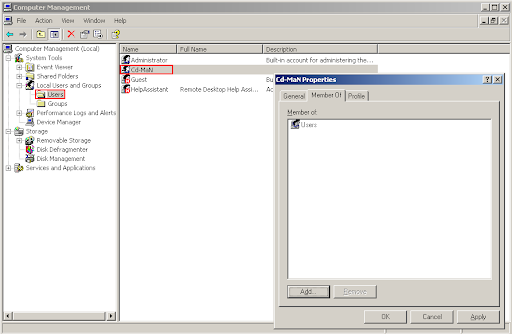
The other important step is to make the user account used on the computer a normal privileged one rather than a high privileged one. To do this we run from the command line the computer management application: "compmgmt.msc".
Go to "Local Users and Groups", select "Users", right click on the current user, select "Properties", go to the "Member Of" page and add the "Users" group (make sure to use the plural form, not "User") and remove any other groups (like "Administrators").
There is a small problem with this method: by default members of the "Users" group can not change the current date/time on the computer. This is done to prevent the users from falsifying timestamps on files and in the eventlog. However the side-effect of this restriction is that double clicking on the clock in the tray to get a calendar does not work (because the system immediately tries to acquire the "SeSystemtimePrivilege" and it fails). This makes a common usecase impossible: using the given calendar to find out time/date information (like what’s the date next Monday?) rather than effectively changing the time. By the way, this has been fixed in Windows Vista, where the system only tries to acquire the privilege when the user effectively wants to change the date/time (clicks "Ok").
To resolve this problem, we will grant the current user this privilege. While in theory this is a security hole (it can be used to falsify the eventlog, etc), in practice on a home machine it isn’t a problem. To do this we need the "ntrights" program from the Windows Resource Kit. You don’t have to download however the full resource kit, you can get the ntrights program separately from this site (don’t be mislead by the title saying "Windows 2000", it works just as well on Windows XP).
After having unpacked it to a location where it can be run from (as configure in step three – c:windows for example), go to the command line and do
ntrights.exe -u Users +r SeSystemtimePrivilege
Other tips
If you later need to temporarily revert the security settings (to install a new software for example), you can do it the following way:
- Start a command line as administrator (you will have to know the computer name and the password for the administrator account):
runas /user:[computer name]Administrator C:WindowsSystem32cmd.exe
- From this command line run the "Local Security Settings" application by typing "secpol.msc"
- Change the default policy from "Disallowed" to "Unrestricted" – this is needed because installers often execute files from non-standard places (like the temporary folders) which would be denied by the policy
- Run the installer from the administrative command prompt (so that it has the necessary rights to write to the "Program Files" folder for example)
- Change the default policy back to "Disallowed"
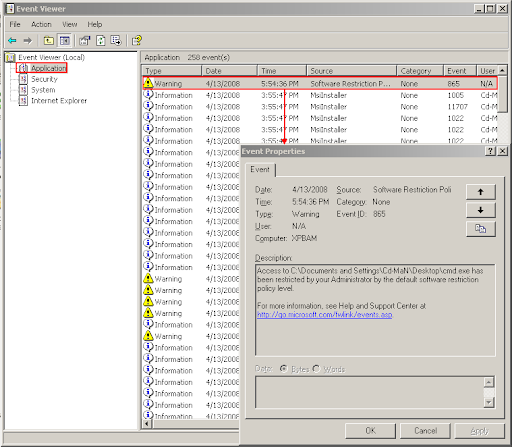
The executables denied by the Software Restriction Policy can be seen in the event viewer. To launch it, again use an administrative command prompt and type: "eventvwr.msc" (this can be useful for debugging why certain applications fail to execute or to check for suspicious activities)
Two minor improvements to the ease of use (at the expense of security) could be setting the system to auto-login and disabling the screen saver (or at least making sure that it doesn’t ask the user to log-in).
Final words
If you have read so far, thank you. While it is true that Windows XP is on its way out, there still will be many systems with it in the coming years. Also, the "a computer person supporting family, relatives, neighbors and so on" is becoming more and more commonplace as more people want/need to use the Internet. If you are that person, I plead to you: please take the time to look through this article and start trying to implement it because it benefits everyone:
- you won’t have to clean up their computers bi-monthly
- they won’t have to work with a system running slower and slower
- also, the risk of their private information getting exposed is reduced
- the Internet community will have to deal with one less taken over computer sending out spam or participating in DDoS attacks
While it may seem like a lot of work to implement these measures (and this is a long post), after doing it once or twice the whole process shouldn’t take more than fifteen minutes.
I don’t claim that such a setup solves all the security problems. It does not solve the problem of phising for example. It also doesn’t mitigate buffer overflow problems, although in practice it can be useful against many of those types of attacks, because they are two phased: in phase one they execute a small amount of code in the taken over browser which downloads and executes the "phase two" malware. Given that we disallowed the execution of unknown executables, stage two will fail, rendering the whole attack ineffective. These settings will however prevent all of the USB-malware which seems to have become quite popular these days.
So you still need to add multiple layers to your defense like using a browser with built-in anti-phising technology (such as Firefox or Internet Explorer 7) and use a filtering service such as OpenDNS. Still, there are other threats out there which may not be prevented by these steps like Cross-Site Scripting (XSS) or Cross-Site Request Forgery attacks (CSRF). These attacks can also be quite damaging because all the web-applications (web-mail, Internet banking, …) we use. I plan to discuss a possible defense mechanism against them in an upcoming post.
Cheat sheet
Here is a quick rundown of all the things from above:
- Install and configure all the programs
- Create the software restriction policy
- Run "secpol.msc"
- Create a new SRP
- Add "Unrestricted" rules for "C:Windows" and "C:Program Files" (as well as other directories you installed programs to)
- Remove the ".lnk" file type from the list of filtered extensions (Designated File Types)
- Make sure that both executables and DLL’s are filtered (Enforcement)
- Change the default policy from "Unrestricted" to "Disallowed"
- Remove extra privileges from the user
- Run compmgmt.msc
- Go to System Tools, Local Users and Groups, Users
- Double click on the user
- Add the "Users" group and remove all others on the "Member Of" tab
- Use ntrights.exe to add the SeSystemtimePrivilege to the users:
ntrights.exe -u Users +r SeSystemtimePrivilege
- When you need an administrative command prompt:
runas /user:[computer name]Administrator C:WindowsSystem32cmd.exe
13 responses to “Windows XP High-Security Configuration”
nice post… just a quick note, in step 1 your link to an instant messaging client points to the .net redistributable package…
Thank you. Fixed.
Windows/Microsoft Office Offline Update:
http://www.heise.de/ct/projekte/offlineupdate/
http://www.heise-online.co.uk/security/Do-it-yourself-Service-Pack–/features/80682
We use this tool in our domain when installing laptops or at home when we update our home systems who might not be connected to the internet via broadband. It’s very effective and easy to use. I’m not sure if there is an English version, but you should really check it out, the GUI is rather self-explaining.
Works great, this is a variation of the method i was taught to secure computers but it works even better because no external software is really required. Thanks for the info it’s good people still know how to tweak XP.
This is exactly the type of setup I was looking for. I have always enforced the limited user approach, and a security template inf file I created for a few other permissions/policies etc. Adding the software restriction policy on top, is a great idea. Gives a little more control what can be done in the user profiles.
runas /trustlevel:"Unrestricted" [pathfile] Where pathfile can be ~local settingstemptrojan.exe
While I realize you offer runas.exe as a convenient means of adjusting SRP settings, leaving runas.exe unrestricted leaves everything unrestricted.
Thanks for the great advice. A computer should be much more secure after following these suggestions.
@Anonymous: SRP has a lot of holes in it (check out the first link in the post), so MS providing a built-in tool to circumvent it isn't that big of a surprise. However:
– the /trustlevel switch seems to be new in Vista/7 and the article talks about XP (even though many of the things can be applied to newer/older versions of Windows)
– the given command doesn't seem to work (tested it under Windows 7). BTW, I didn't really find any documentation about what the given switch does.
The switch functions in XP. It does not circumvent admin privilidge/rights. A user needs to imput admin credentials for admin function. It does circumvent SRP. The switch runs the specified command with the specified trustlevel exception rule:
Unrestricted, disallowed, basic user, restriced, or untrusted.
The sintax is precisely:
runas /trustlevel:"Unrestricted" c:example.exe
(Include quotation marks)
And, unfortunately, the switch does not require admin priviligde.
@Anonymous: thank you for your persistence. I can confirm that it works even on Windows XP (the quotation marks were the key – inconsistent parsing of command line options on Windows, who would have thought?).
The conclusion: there are many ways to circumvent SRP (including the manipulation of the process memory), but using Microsoft's own tools seems the most elegant 🙂
Thank you again for bringing this to my attention.
Elegant, indeed. 🙂
Disallowing runas.exe is necessary to limited account control. I'm not aware of what, if any, conscequence would occur in an environment where the Secondary Logon service were running and runas.exe disallowed. Secondary Logon is disabled in my environment. I do know the trustlevel switch functions without Secondary Logon and the user switch does not.
Thank you for confirming it for your readers. It is good information to have.
Also you can right click runas following user
domain/user
password
This bypasses it
For Step 3 – Setting up the Software Restriction Policy…You do not need to expressly add entries for C:Program Files and C:Windows as you recommend. It is redundant, as they are already added by Default as part of the first four entries! They look like entries to the Registry, but the words SystemRoot is the Windows directory and ProgramFilesDir is obviously the Program Files directory.
What you should do, is block the following executables from running in a hardened (shared with multiple users) system by creating a New Hash Rule….
* cmd.exe
* regedit.exe AND regedt32.exe
* runas.exe
There's one thing I change in the Registry. So use the Registry Editior…
=> Go to this: HKEY_LOCAL_MACHINESoftwareMicrosoftWindowsCurrentVersionPoliciesExplorer
=> Add this DWORD: HideRunAsVerb
=> Set it to the value of 1
This disables Run as… when you right-click or Shift + Right-click on an executable or application file.
By doing the above, we have removed the ability to use runas.
I also recommend with SRP to set all users except local administrators. Then create Limited User Accounts for each person who is going to use the system. This will instill a new habit of not being randomly running things without consideration.
It also means Didier Stevens's bpmtk.exe isn't able to run; as you have cut off the ability to run foreign executables.
Now all you need to do is develop computer security aware policies or rules as to how new programs need to be checked and verified, so they can trusted to be installed onto your system.