The premise of this tutorial is that you wish to install AVG for home use (because the free license covers only that) at a friend, relative, parent, etc, and the person who you are installing it for is not a power user. In fact these two posts (Installing AVG and Installing Avast) are an extension to my Windows XP High-Security Configuration post, which needed updating, because in the mean time AVG 8 came out. Credit goes to the GSD blog for writing a detailed article about AVG 8, following up with an other one and showing how to manually update AVG 7.5 installations (because it is unclear at this moment how long Grisoft will support the older version with automatic updates).
The steps to installation are:
Download the install kit from the AVG website. Take care to carefully read the wording, since during the several steps it is needed to download, they will try several times to upsell you. This is not necessarily a bad thing (after all, they are giving away a product for free).
If you use Internet Explorer, you might have to explicitly authorize the download (by clicking on the yellow bar that appears on the top).
Choose to save the file (don’t run it at this point!). The following step assumes that you’ve saved the file on your Desktop.
Now that you have it saved on your desktop, launch a command shell (by going to Start -> Run and typing cmd), change to the directory to where you’ve downloaded the file (usually this would mean typing “cd Desktop“) and launch the install kit with the following parameters: /REMOVE_FEATURE fea_AVG_SafeSurf /REMOVE_FEATURE fea_AVG_SafeSearch The easiest way to do this is to start typing the name of the install kit (avg_), then press the Tab key, which should auto-complete the rest. Now copy the command line attributes and right-click on the shell window and select Paste. Alternatively here is the official FAQ entry. The setup might ask you to close some programs (mainly browsers) before continuing, so be prepared to do so.
Now choose the Custom install option
And deselect the LinkScanner option. You could also deselect also the Email scanner option if you are not expecting “traditional” email clients to be used (if for example the user(s) only use web based email like Gmail, Hotmail, Yahoo mail, etc.).
Disable the daily scanning and finish the setup.
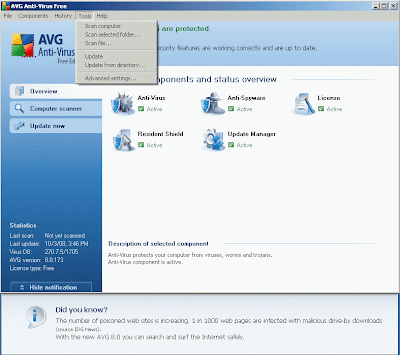
Now all that remains to be done is some final tweaking of the settings: open the AVG control center and go to Tools -> Advanced Settings.
Change the settings such that updates which require reboot are only applied at the next reboot, the user is not nagged about them. This usually is more convenient (and less confusing), however it may not be appropriate in cases when the computer is not rebooted for long periods (this includes the cases of laptops which are not rebooted, only hibernated or switched in sleep mode).
Finally, you might want to set the “Autoheal” option to avoid bothering the user.
To sum it up:
- Download the install kit from the AVG website.
- Save the install kit
- Run the setup with the switches /REMOVE_FEATURE fea_AVG_SafeSurf /REMOVE_FEATURE fea_AVG_SafeSearch
- Choose “Custom install”
- Deselect “LinkScanner”. Also deselect “E-Mail Scanner”, unless you use a dedicate email client (like Outlook or Thunderbird)
- Disable the daily scanning
- Finish the setup
- Launch the AVG Control Center and go to Tools -> Advanced Settings -> Update and select “Complete at next computer start”
- You might also want to check “Resident Shield” -> Autoheal to keep things simpler
