Having the best audio/video quality available when you publish media is very important. I’ve heard an theory (which sound logical – although that doesn’t automatically mean that it is true :-)) that if the voice quality is poor, you get more tired of listening to it, since your brain works harder during the interpretation phase (because it has to fill in the blanks).
Of course if you have a good source material, it goes a long way. But even if you don’t, you can do some post-processing to make the quality less-bad. In the following example I will use the recording for the talk Beer Hacking – Real World Examples by Scott Milliken and Erin Shelton as it was published by Irongeek. I don’t want to harp on Irongeek, since he has a great site with lots of useful resources, but this video was unwatchable. What are the problems which we’ll try to fix:
- very low audio volume
- background noise
- interlacing artifacts
The tools we will be using are cross-platform (meaning Windows, Linux and MacOS X), even though the screenshots are from a Windows machine:
- Avidemux (which I gave a short review some time ago). On Windows you can use VirtualDub which is an other similar tool (also free and open-source), but it is Windows specific. If you want to go with VirtualDub, you have to have the correct video codecs installed (I would recommend ffdshow)
- Audacity for audio editing
- The Levelator from The Conversation Network
First, we load up the video in Avidemux. The first we observe is that it has interlace artifacts (because it was probably ripped from a DVD which mainly targets interlaced display – ie. TV sets – as opposed to non-interlaced displays – ie. LCD screens). These are quite easy to fix, so we come back to them later.
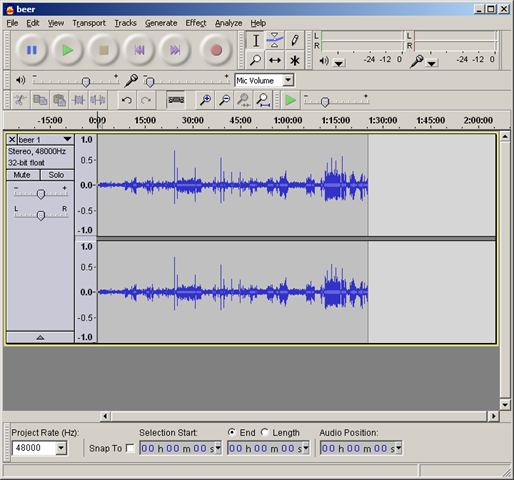
The first thing we do is to export the audio, so that we can work on it separately. Go to Audio –> Encoder and select and select WAVE PCM. Then go to Audio –> Save and save it somewhere (this is uncompressed audio, so expect it to take up some disk space – ~900 MB in this case). Now we have to do two things: remove (or reduce) the noise and raise the volume. Usually I would recommend doing this in the order I just said (noise removal first and the raising the average volume) so that the second process doesn’t amplify also the volume, but in this case (because the initial volume is so low), we will have to do noise removal twice. Below you can see the waveform of the AVI file (notice the low level of the volume):
Sidenote: notice that the sample rate of the sound file is 48000 Hz (samples / sec). This again is most probably an artifact of the fact that it was ripped from a DVD. I usually find 44100 Hz stereo with 16 bits good enough and I am of the opinion that anything above that is not really noticeable. However we won’t change the sample rate in this case to avoid possible issues (like desynchronizing the audio and video).
To remove the noise, select a couple of seconds of silence (where you hear the background noise), go to Effect –> Noise removal and click on the “Get Noise Profile” button. Now press cancel. Then select the whole audio and go to the plugin again and press Ok. Notice that aggressive noise removal can lead to voices sound “metallic”. Use the preview button to strike a balance between the noise level and voice quality. I found values between 10 dB and 14 dB to be a good choice. Export the resulting file in WAV format.
Now it is time to use The Levelator. What is the levelator? It is a very easy to use program: it contains absolute no properties to “tune”. You just start it, drop your WAV file on it and wait for it to finish processing. However, in the background it contains some very nice algorithms which compress and normalize the the audio file. It is meant to work with an input containing voices from multiple persons (like a podcast or a panel) and raises them to the same level. We could have done what the Levelator does with Audacity, but it would have been a lot of work.
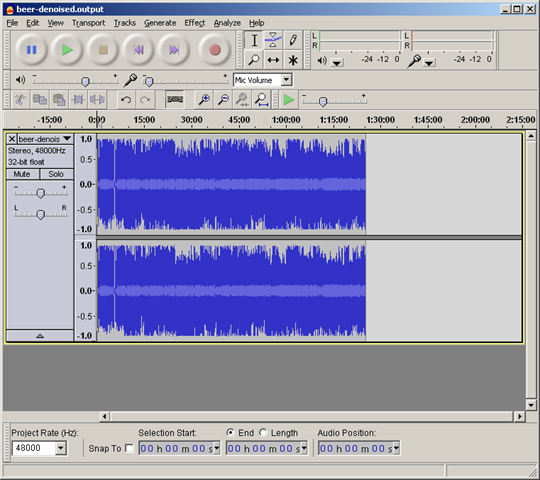
Here is how the audio looks like after normalization. As you can see the volume is much more uniform (without clipping anywhere!). The Levelator saves the output file in the same directory as the original one (so make sure that you have free space) with the suffix .output. You can do a second pass of noise removal (usually this is not needed, but since we had to amplify the audio very much, we also inevitably amplified some noise).
Now we put it all back together: go to Avidemux and select Audio –> Main track. Choose “External WAV” and specify the wave file you’ve exported from Audacity (after the second denoising). Press ok. Go to Audio –> Encoder and select MP3 (LAME). I would recommend to use the “Joint stereo mode” with a constant bitrate (CBR) of 64. “Joint stereo” means that the commonalities are encoded only once and for the two channels only the differences are kept. This greatly reduces the data volume (if the two channels are very similar – which they are in this case), thus resulting in improved quality at the same bitrate. I wouldn’t recommend going mono, since some players have weird issues playing back mono streams. The same is true for bitrates below 64 kbps and VBR / ABR modes.
Sidenote: using lossy compression (like MP3, XviD, H.264) repeatedly leads to degraded quality. When possible use lossless formats (like WAV or FLAC) during the processing phase and only render to a lossy format at the end.
For the video part: for the encoder select MPEG-4 AVC (x264). Use the filters button and add a deinterlace filter (I used yadif). Now use the calculator to find out the bitrate you need to set for a particular filesize. For example a bitrate of 800 kbps resulted in a ~548 MB file (you need to consider also the audio part when estimating the final filesize – this is why it is easier to use the calculator).
Now configure the encoder. I would recommend the “Two pass – average bitrate” mode. This means that the encoder does two rounds: first it estimates the “compresseability” of each frame, and on the second pass it does the compressing. This mode results in better quality and better approximation of the desired file size at the expense of doubling the encoding time (even so, it was done in less than a hour on a Core 2 Duo @ 2.39 GHz). When all the parameters are set, go to File –> Save –> Save Video to render the result.
Hopefully this tutorial will help people in producing better quality media. If you have questions, please leave them as comments and I will try to answer as fast and as best as I can. I’m not a multimedia guru, but I play around a lot with these tools.
Update: below is the resulting video. You can compare it to the original.


One response to “Basic multi-media (post)processing”
cdman83 – really great tutorial! Excellent walkthrough using a real-live situation.
I've used Audacity quite a lot in the past but your introduction to the Levelator will really help things along nicely.
Thank you for taking the time to share your knowledge and familiarity with the community in a very simple way. It cuts through all the advanced methods and features and allows someone to quickly reproduce a much more refined output.
A very valuable post!
Cheers!
Claus V.